
If you’re new to blogging and using Blogger, you’re in for a fun ride!
Blogging is like an online diary where you can share your thoughts and stories. Now, the tool we use to write and make our blogs look cool is called the Blogger Post Editor.
In this guide, I’ll take it step by step and make things super easy.
Whether you’re just trying out blogging for fun or you have a small business, I’ll show you how to use the Blogger Post Editor so you can make your blogs interesting and awesome.
Table of Contents
What is Blogger Post Editor?
Blogger post editor is a simple tool in Blogger dashboard which helps us to write new posts for our blog.
Using Blogger post editor we can easily edit, design and publish a new post to our website or blog.
In this beginners guide to blogger post editor, we will learn various functions of Blogger post editor & know how to use them?
Important Parts: Post Title & Post Body
In the post title of Blogger post editor, we have to write the title of the post.
For example, you can see the title of this post ( i.e. Beginners Guide to Blogger post Editor ). In the same way, you have to use post title for your blog post.
Use the title of your blog post in such a way that readers can easily understand, what the topic is going to be all about?
In post body, you have to write all the content of your blog post. It must include headings, sub-headings, images, links etc.

Important Tools of Blogger Post Editor

Here in the above image, you can see all the important tools of Blogger post editor. Well, these are also discussed below in the same manner :
1. Compose/HTML
Compose/HTML function is used to view the HTML code of your blog post. It is quite beneficial when it comes to adding HTML widgets within your blog.
In order to use it, you can simply click on HTML to see HTML view of your blog post & back on compose to write your blog.
2. Undo/Redo
These are buttons used to Undo any of our last edit in Blogger post editor. Also, you can redo any edit using Redo button.
The shortcut key for Undo is Ctrl + Z and for Redo is Ctrl + Y. These buttons are very helpful when you write blog posts using your phone.
3. Font Family/Font-Size
You can easily use the font of your choice by selecting it from Font Family. Blogger comes with fonts like Arial, Courier, Helvetica, Times etc. The default font of your blog post is Arial.
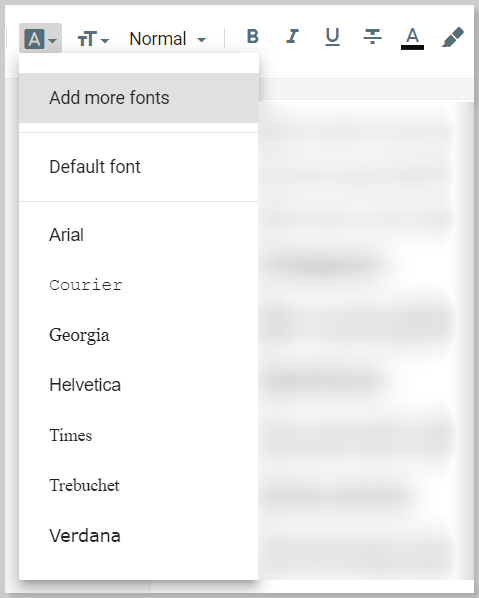
If you want to decrease or increase font size, then you can easily do so by selecting the size of the font from Font Size.

4. Format
With the help of this tool, you can easily add Heading, Sub-Headings, Paragraphs, to your blog. Use of Headings & Sub-Headings makes your blog look beautiful.

5. Bold / Italic / Underline / Strikethrough
These are some common tools we use in our everyday life.
Bold help us to increase the thickness of the text & make it look different and important ( e.g. Beginners guide to Blogger Post Editor ).
Italic is used to make the text slant to the right ( e.g. Beginners guide to Blogger Post Editor ).
Underline is used to underline any text ( e.g. Beginners guide to Blogger Post Editor ).
And the last Strikethrough is used to strike the text. ( Beginner’s guide to Blogger Post Editor ).
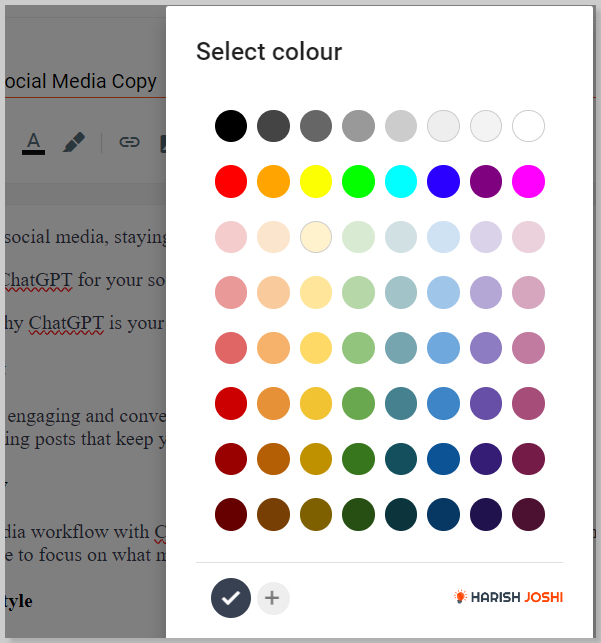
6. Font Color / Text Background Color
Font color is used to change the color of the font/text ( e.g. font color ) and text background color is used to change the background color of the text.
7. Add or Remove Link
You can use this option to insert a hyperlink on your text. An example is shown below :
# 5 Best Books for Preparation of CDS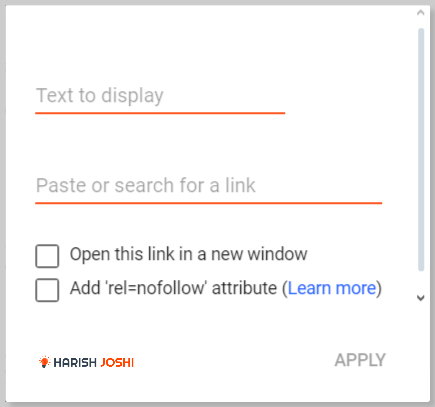
You can even choose this link to open in a new tab or add a nofollow attribute to it.
8. Insert Image / Insert a Video
Using Insert Image, we can easily add an image to our blog post. In order to upload an image, you have to click on the Insert image icon & then upload the image. You can upload images from your computer, an image URL or from Google Drive.
Using “Insert a Video”, you can add your videos by uploading them. You can also use YouTube videos on your blog.
9. Insert Special Character
Using this tool, you can easily insert emojis & special characters into your blog.
It consists of a number of emojis, symbols, arrows etc. It helps a lot if you use special characters in your blog (e.g. λ, ∞, etc. ). This tool is very helpful if you use mathematics formulas & equations in your blog post.

You can easily search for any symbol by its name or by drawing that symbol.
10. Insert Jump Break
Jump break is used to break articles into two parts. It is basically used to show Read More after a little excerpt. We use Jump break in our post in order to show only a little excerpt of the post in homepage or feed. If the reader wants to read the complete post, then he can simply click on Read More to view complete post.
It makes blog posts look good in the Home Page & helps in giving a cool look to our blog.
11. Alignment / Numbered List / Bulleted List
We can easily align or arrange the text of our page toward left, right or center of the page using Alignment option.
To use an ordered list of items in our blog, we use Numbered list & for using an unordered list we use Bulleted list. We can also easily create a list using HTML tags.

Check out this post of HTML tags for creating a list: HTML Basics every Blogger should know!
12. Quote
Using Quote, you can easily write a quote on your blog post. The best example of the quote is given below:
Don’t stay in the bed, unless you make money in the bed.
You can easily create such quotes using this tool.
13. Clear Formatting
If you have added any type of formatting in the text of your blog ( e.g. Bold, Italic, Strikethrough etc.) then, you can easily remove all the formatting at once by using this tool. It can help you save a lot of your time.
14. Layout
Suppose, you want to write a post from Right to left, so you can easily covert a “left to right post” to “Right to Left post” using this option.
15. Input Language
This is an amazing tool in blogger. Suppose you want to write a post in Hindi, but you don’t know how to write in Hindi, then this tool works wonders for you.
Using this tool you can type in English & write in any other language.
Other Important tools of Blogger Post Editor
Some other important tools of Blogger post editor are as follows:
16. Labels
The label is another important tool of Blogger.
You can add the category for your post using this option easily.
Suppose you have written a post like “HTML Basics every blogger should know!” and want to add two categories to this post ( e.g. HTML, Blogger) then you have two add these two labels in the labels box separated by commas.
You can add more categories too.

17. Schedule
If you want to schedule your blog post for a particular day or time, then you can easily do so by using Schedule option on Blogger.

18. Permalink
You can set permalink (or URL ) for your blog post using this tool. If you don’t use this tool blogger will automatically set the permalink for your post. I recommend you to set your own permalink. A good permalink is one which contains focus keywords.

19. Location
If you want to show your location in your blog post, you can easily do so here. All you need is to search for your location & add it.

20. Options
Here are some more options which can be used to allow or disallow comments on our post.

Publishing Tools of Blogger Post Editor
Here are some more tools which we can use in order to publish our blog post and make it visible to readers.

Publish
After clicking on Publish our post got published and can be visible in our blog.
Save
Using this button, we can save our blog post to Drafts. We can later edit or publish our blog posts in drafts.
Preview
We can easily see a preview of our post before publishing it using this option.
This is how we have finished learning all the settings or tools in Blogger post editor. Now you can confidently create blog posts & update existing posts.
Related Posts:
- HTML Basics every Blogger Should know!
- Step by Step Guide to Start a Free Blog in Blogger
- Make Money Online Guide for College Students in 2018
Conclusion
I have discussed all the important parts of blogger post editor.
I’d appreciate if you leave your valuable comments & suggestions in the comments section.
In this post, I have covered a complete overview of Blogger post editor. In my next tutorial, I will discuss Step by step guide to set up the custom domain name in Blogger.
Related Posts:


This was insanely helpful! Thank you for laying everything out in plain English
Thanks Cassie for your valuable comment! ❤
This is so helpful! I still am learning about blogging on a daily basis. This really explains things well.
Hi Amber,
Thanks for your comment. You can subscribe to my blog for other Blogspot tutorials. ❤
I see so many great tips in this post that I can use when I edit my blog. I have been blogging for ten years but I can always learn from a post like this.
Thanks Melissa for your comment. ❤
If only articles like this existed years ago when I started it would have been so helpful. Glad you are doing this.
Thanks Valerie. I would love if you suggest this post with newbie bloggers.
Great info on post editor. This definitely would help newbie bloggers!
Even though I use wordpress, you have provided a great step by step guide. Some awesome tips and makes me want to come back for WordPress tips.
Thanks Serena. I’ll start a WordPress tutorial soon.
So many great information! This is perfect for a new blogger.
This is so helpful! It is very informative. I like your writing style. Thanks for sharing this article.
Thanks Olga for your comment!
Wow a really fantastic step by step guide. I have wordpress but a few friends i know have been wanting a blogger page and this would be great for them.
Thanks Jennifer for sharing this post. ❤
I’ve never considered using a blog editor before. After reading your post, I think I’ll have to look into one for my posts!
Ooooo so very helpful for all the blogging newbies!! It can be tough to figure this stuff out!
Thanks for this basic comprehensible tutorial. I believe any beginner can follow these instructions easily.
Such a helpful guild. I had no idea you could insert special characters like that! Thak you for showing me how.
Yes, Alaina you can easily insert a special character on your blog. Hope you enjoyed the post! Thanks for yiur comment.
These are truly enormous ideas in concerning blogging.
You have touched some fastidious factors here. Any way
keep up writing.
Thanks for sharing these tips! I haven’t used that location feature. Maybe soon!
Hi Blair, Thanks for your comment !
Thanks for this guide, I’m more familiar with WordPress so I really need to know the basics of Blogger. I like how this guide is very detailed and how you added screenshots for the steps as well.