
If you’ve just started on your blogging journey and chosen Blogger as your platform, you’re in for an exciting ride.
Today, we’re going to tackle a common question that might be buzzing in your mind: “How do I set up domain name in Blogger?”
In my last tutorial, I have discussed a step by step guide to get a free domain name for your blog. However, free domain name comes with a number of limitations like limited control, subdomain structure, ownership issues, and possible SEO impact.
Even Freenom has recently stopped registering new domain names, so never gonna know when these companies gets out of business.
Well, in this guide, I am using Bigrock (a trusted brand) as a domain register & have shared a step-by-step guide on how to setup Bigrock domain in Blogger.
While creating your blog on Blogspot, you will get a free subdomain with your blog. Generally, the structure of the subdomain is like example.blogspot.com.
If you want to change the URL of your blog to example.com, then you need to buy a custom domain name.
Table of Contents
Benefits of having a Custom Domain name
There are many advantages of having a custom domain name. I have listed some important benefits below:
1. Custom Domain Names are Search Engine Friendly
If you want your blog posts to rank higher in Google search, then you should purchase a custom domain name for your blog. Search engines like Google, Bing, and Yahoo prefer blog post with a shorter domain name for SEO.
Having a custom domain name also helps in improving page rank and Alexa rank of your blog.
2. Short & Easy to Discover
It is hard to remember a name like harishjoshi.blogspot.com. On the other hand, custom domain names (like harishjoshi.com) are short and thus easy to remember.
Use of custom domain name can also help your readers to discover your blog easily.
3. Professional Email Address
Using a custom domain name, you can easily create your own professional email address like support@harishjoshi.com. Having a professional email address can help you build credibility among your visitors.
4. Subdomain for your Blog
While using a subdomain, you can not create a subdomain for your main blog, but If you are using a custom domain name you can easily create more subdomains for your blog. (e.g. shop.harishjoshi.com)
5. Higher Chances of Adsense Approval
Google Adsense is the best way to monetize your blog with advertisements due to its high rates. There are higher chances of getting approved with a custom domain name.
These are the 5 ways in which a custom domain name can help you.
Now, let’s move to step by step guide on how to setup Bigrock custom domain in blogger.
BigRock is an ICANN accredited leading provider of web-presence solutions to small businesses, professionals, and individuals. You can easily purchase domain names, web hosting & other solutions from Bigrock at affordable prices.
If you have not yet purchased a domain name from Bigrock, you can simply visit the below link for a better deal:
If you already have a domain name, you can follow the below guide:
Steps to Setup Bigrock Custom Domain in Blogger
Here, in this step by step guide below, I have explained the complete procedure to setup Bigrock custom domain in blogger:
Step 1: Login to your Blogger Dashboard
In step 1, you need to login to your Blogger Dashboard.
After, you have successfully logged in to your Blogspot dashboard visit the following: Settings >> Publishing >> Custom Domain.
It can also be seen in the below screenshot. After that Click on Custom Domain, and proceed to Step 2.

Step 2: Enter your domain
After following Step 2, just enter the domain name you have purchased as shown in the image below.
Don’t forget to add www as a suffix with your domain. And then just Click on Save Button.

Step 3: Note the DNS Settings
You have got an error!
After Clicking on Save button, you will see an error message. It will be like “We have not been able to verify your authority to this domain. Error 9“. Also, you will get a set of DNS settings which includes two CNAME records. Take note of the following two CNAME records. You have to use these CNAME records in Step 6.

Step 4: Visit Bigrock cPanel
Now leave the Blogger dashboard as it is & open Bigrock Control panel in a new tab. Log in to your account and click on the domain you want to set up for your Blogspot blog.

Step 5: Your Domain >> Manage DNS
Now after following Step 5, search for Manage DNS. It might be at the end of the page. After you find the DNS settings, Click on Manage DNS as shown in below snapshot. Follow Step 6.

Step 6: Add CNAME Records
In step 6, you need to enter the CNAME records, you have noted in Step 3.
- Add your first CNAME record by clicking on CNAME Records and then Add CNAME Record

- After clicking on Add CNAME Record, a new page opens. Here you need to enter www in Host Name and ghs.google.com (See Step 3) in Value as shown in the snapshot below. Then simply click on Add Record.

- Since you have two CNAME records from which we have added one. You have to follow the same steps for adding another CNAME record. Just click on Add CNAME record.

- Add Host Name, Value (as in Step 3) and then Click on Save as shown below:

- In the below snapshot, you can see all your CNAME records in one place. Now move to Step 7 to add A records.

Step 7: Add A Records
After adding the CNAME records, you need to add A records to your DNS. Here is the list of I.P. address you need to enter as an A record. Here are the I.P. addresses:
- 216.239.32.21
- 216.239.34.21
- 216.239.36.21
- 216.239.38.21
Let us add the first A record!
- For this, you need to click on Add A Record under Manage DNS.

- Then, in the next screen add first I.P. address in Destination IPv4 Address and leave all other fields blank & simply click on Add Record.

- Add another A record in a similar way by clicking on Add A Record & then proceed above. You have to repeat this for four-time and add four I.P. address as shown above. I have just skipped these three steps. After adding all the four A records, the final screen will be as shown in below snapshot.

Step 8: Save Domain back in Blogspot Dashboard
After successfully adding all the records discussed above, now go back to Blogspot & save the domain name. Don’t forget to check the box that says “Redirect yourdomain.com to www.yourdomain.com”. At last click on Save!

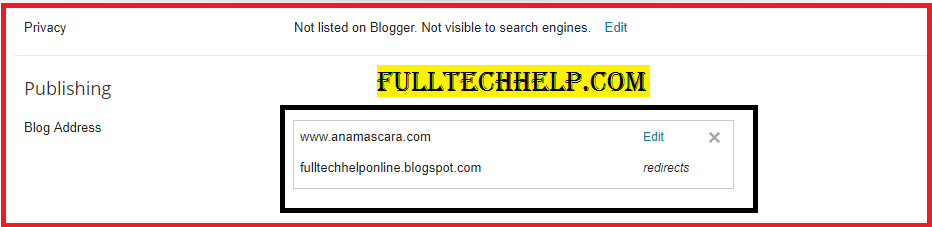
That’s it. Now you have successfully mapped your custom domain to your Blogspot blog. You can see it in Basics under the Setting section of your Blogspot dashboard.
See Also:
This is how you can setup Bigrock custom domain in blogger. Let us summarize the complete post:
Summary:
Setting up a custom domain name is very important if you are serious about blogging. A custom domain name is short, easily memorable & SEO optimized.
Also, having a custom domain can boost your Blogging productivity. Here are the 8 steps which we have taken to setup Bigrock custom domain in blogger:
- Blogger Dashboard >> Settings >> Publishing
- Add Domain
- Note the DNS Settings (CNAME Records)
- Visit Bigrock cPanel
- Your Domain >> Manage DNS
- Add CNAME Records
- Add A Records
- Save the Domain back in Blogspot Dashboard
In my next post, I’ll be back with some more Blogging tutorials.
Leave your love, suggestions, and queries in the comment box.


Thanks, I’m not a Blogspot user but, as a bit of a technophobe, I found this interesting and learned a lot.
Thanks Phill for reading this article.
I am saving this to send to some of my clients who need a lot of tech help. This is so thorough!
Hi Emily, Thanks for sharing this post.
Nycccc it give more information as my expectations….👌👌👌👌👌👌
Hi Pawan, Thanks for your comment. I hope you love this post.🙂
This was very easy to understand, thank you for also providing photos for step by step help! Luckily my mom is tech savy and was able to help me with all this but this goes into great detail! Much appreciated!
Hi Alannah, I think you should also learn these Blogging basics. You can easily do so by subscribing to my blog. And, thanks for your comment.
This I find very useful but I’m not using this platform but hope those who do will benefit
Hi Juli, you can share this post with your Blogspot friends. Soon, I’ll post some tutorials on WordPress too. Thanks for your comment. 🙂
I like the style of your writing. it is very simple, informative and easy to follow. thank you for sharing
Hi Nina, Thanks for appreciating my work. Hope you love this blog post.🙂
This is so helpful for all the new Bloggers, thanks for including step by step instructions with images.
Hi Pearl, Thanks for your comment.
This is a useful post for those on Blogger. I use WordPress but I can see the benefits of having this. An interesting read.
Thanks for your comment.🙂
This is very informative. The step by step photos are a big help
Hi Madison, Thanks for your comment. ❤
I was on a Facebook group the other day and someone was asking a question on how to link a blogger bases blog to a custom domain. I think this will come handy for him but I need to do a lot of searching to reach that post again.
Hi Adaezeboltbethel, Thanks for your comment & efforts. 🙂
I absolutely love the screenshots through this post; super informative!
Thanks Joe. ❤
It’s great that you provide this info for beginners. It can be overwhelming when you start out.
Yes, I think you’re right. Thanks for your comment. 🙂
Very informative and easy to understand post. Thanks.
Hi Isaac, Thanks for your comment.
Great detailed post with easy to follow directions.
Hi Evelyn, Thanks for your comment. 🙂
I dont use this one bit I did find the post very informative. I just got approved for my adsense this week. Yay!
Hi Jessica, Greetings for your AdSense account. Thanks for your comment. 🙂
Blogging and all the technical aspects of it can be very complicated. Thanks for sharing all your tips and the detailed steps. This is very helpful!
Hi Marysa, I’ll post more tutorials on Blogspot soon. Thanks for your comment. 🙂
Thank you for giving us information I will apply this soonest!
Thanks Maysz. ❤
Wow! This is such a very informative post and I am sure this will be a great help to all bloggers most especially the new one.
Yes Emma, I’ll share more tutorials on Blogspot soon. Thanks for your comment. 🙂
I need to do that, Thanks for sharing!
Hi FlySoulmates, I hope you love this post. Thanks for your comment. 🙂
Great tips for someone who is starting blogging.
Hi pujarini, Thanks for your comment. 🙂
Awesome post. Thank YOu for all these tips!
Hi Jan, Thanks for your comment.
I’m working on getting my own domain, and this article helps prove that the money will be worth it for me!
Hi Aleese, you can easily get a domain from Bigrock.in. Thanks for your comment.❤
i was on blogger before i moved to wordpress, wish i had read this before i made the big move.
No worry, you can share this article with your blogspot friends. Thanks for your comment.
I can imagine this would have been very useful before I went over to self hosting. There are always tips and tricks about transferring information I Can find useful here still. Very informational.
Hi David, thanks for your comment. 🙂
I love having a personal domain! Makes things more official and easier for people to remember!
Yes, there’s a lot of benefits of having a custom domain. Thanks for your comment. 🙂
Not only does it look professional, but there’s a true sense of ownership also that comes with owning your on domain.
Hi AC, having a custom domain can help us in many ways. Thanks for sharing your opinion. 🙂
Good job with clear step by step instructions. Some people have a difficult time with technical writing and instructions, so you’re a gem!
Thanks Novel for appreciating my work. ❤
I feel like I missed out on using Blogger. I was always using B2 (WordPress’s former name) since I started blogging in 2003.
Hi Jojo, Thanks for your comment.🙂
very useful post thanks for sharing it
wow, well done. this was really informative and broken down well, i would definitely recommend your blogs to my friends who wish to start blogging in blogger
Oh My Goodness! I wish I had known about your blog when I started my website a few months ago! Your details and steps are so easy to follow!!
If anyone tells me they are looking to get their own custom domain I’ll definitely be directing them to your blog as this is explained really well and in a way that those who are not particularly tech savvy would understand
Having your own domain name, gives unique identity to the blog. And gives more adsense approval and others.
Hey there! I just wanted to ask if you ever have any trouble with
hackers? My last blog (wordpress) was hacked and I ended up losing many months of hard work due to no data backup.
Do you have any methods to protect against hackers?
Hi there, UpdraftPlus is a free WordPress plugin you can use to automatically backup your site. What I do is, backup my site every week with UpdraftPlus so as to prevent data loss.
Its a very helpful post. Thank you…
Helpful post for those wanting to get on it with blogger! I know a few people who would be interested, so I will have to direct them this way! Thanks
Thanks
thank bro real nice post