

You hit publish.
The post is live. You refresh the page a few times, feel a small rush – and then realise you have no idea what to do next.
This is where most bloggers go wrong.
Publishing is not the finish line. It’s actually closer to the starting gun. The work you do in the hours and days after hitting publish determines whether your post gets read by 10 people or 10,000.
Here’s everything I do after every post goes live – in the exact order I do it.
Table of Contents
Why Post-Publish Work Matters More Than Most People Think
There’s a popular saying in content marketing: spend 20% of your time creating content and 80% promoting it.
That’s not entirely true for SEO-focused blogs – where publishing consistently and letting Google do the work is a real strategy. But the principle behind it is right.
A blog post sitting on a brand new page with no internal links pointing to it, no promotion, no indexing request is invisible to both search engines and readers.
Google won’t find it quickly. Readers won’t either.
Post-publish work solves both of those problems. Let me walk you through it step by step.
Step 1: Do a Final Live Check (5 Minutes)
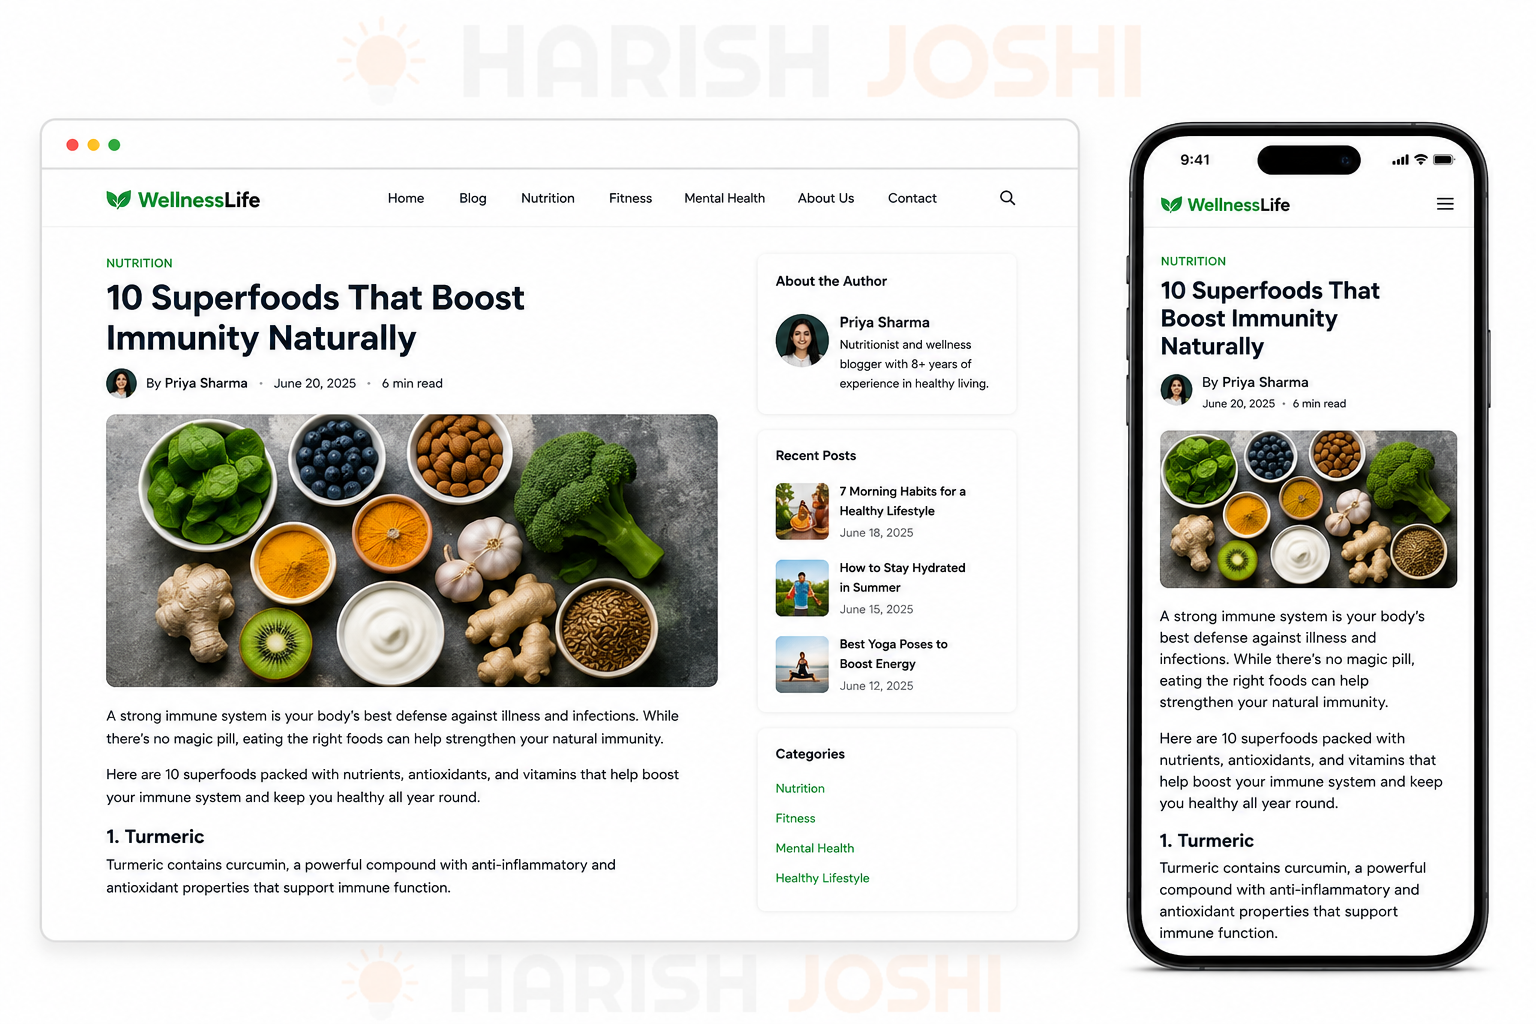
Before you do anything else, view your post exactly as a visitor would.
Open it in a new browser tab and check:
- Does it look right on desktop?
- Open it on your phone – does it read well on mobile?
- Are all the headings rendering correctly?
- Do all the links actually work and go where they should?
- Are the images loading and displaying at the right size?
- Is the meta title and meta description showing correctly?
This takes 5 minutes.
But it catches the formatting issues, broken links, and rendering problems that always seem to sneak through between draft and publish.
Pay special attention to mobile. According to Google’s mobile-first indexing policy, Google primarily crawls and indexes the mobile version of your pages – not desktop. If your post looks broken on a phone, that’s what Google sees too.
Step 2: Request Indexing in Google Search Console (3 Minutes)
This is the single most impactful thing you can do immediately after publishing – and most bloggers skip it entirely.
When you publish a new post, Google doesn’t know it exists yet. You can wait days or weeks for Googlebot to stumble across it on its own – or you can tell Google about it right now.
Here’s how:
- Go to Google Search Console
- Paste your new post’s full URL into the inspection bar at the top
- Click “Request Indexing”
That’s it.
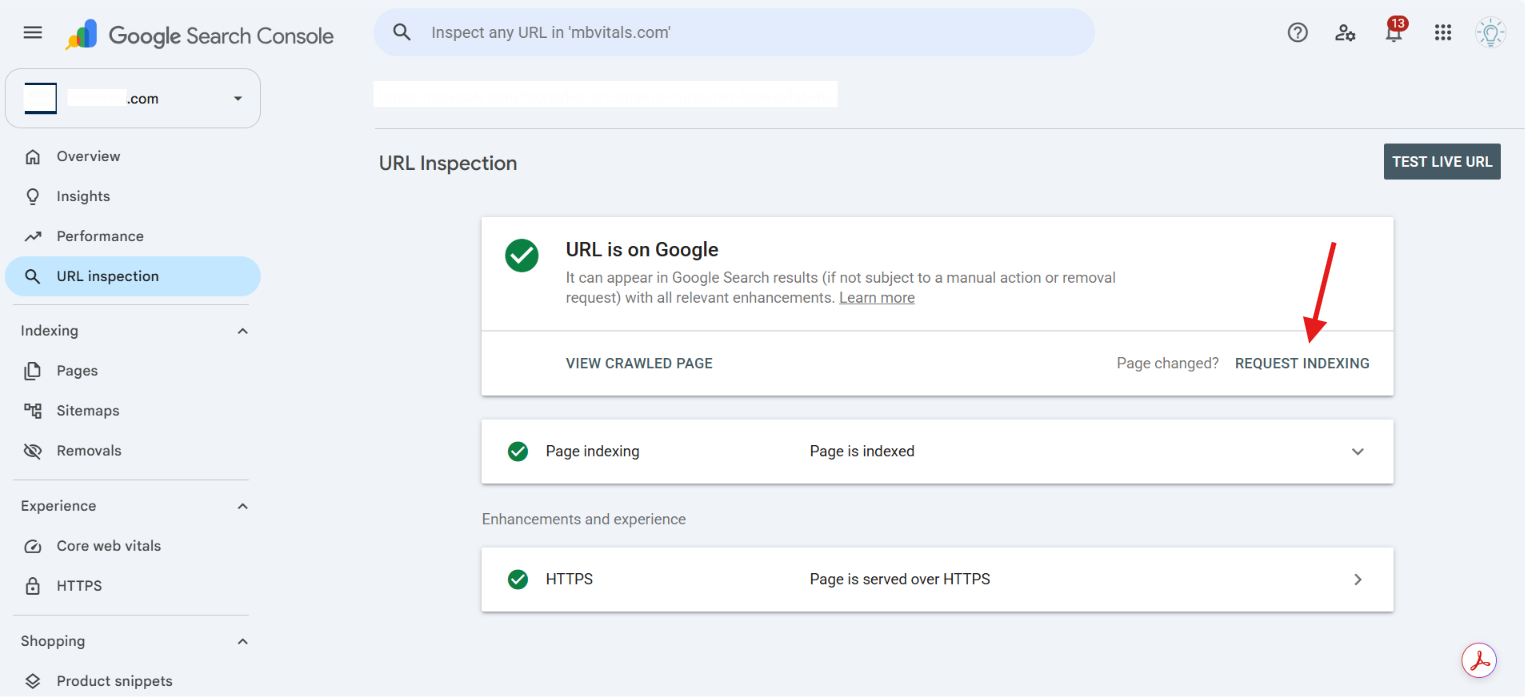
According to Google’s official recrawl documentation, this places your URL in a priority queue and can cut indexing time from days or weeks down to hours.
A few important notes on this:
- Don’t submit the same URL multiple times – Google’s documentation is clear that requesting a recrawl of the same URL more than once won’t speed things up further. One submission is enough.
- You need to be a verified owner or full user of the Search Console property to use this feature.
- If you’re publishing multiple posts in a day, you can also submit your sitemap via Search Console’s Sitemaps section – this covers everything at once.
This one step alone is worth more than any fancy distribution tactic for getting Google to see your content fast.
Step 3: Add Internal Links – Both Ways (10–15 Minutes)
This is the most overlooked SEO task after publishing – and one of the highest-impact ones.
Internal linking works in two directions, and both matter.
Direction 1: Link FROM your new post to older related posts. As you write, you’ll naturally reference related topics. Link those references to existing posts on your blog. This keeps readers on your site longer and helps Google understand the relationship between your content.
Direction 2: Go back to older posts and link TO your new post. This is the one most people forget. Your older posts are already indexed and may already rank for something. Adding a link from them to your new post passes some of that authority – what SEOs call “link equity” or “PageRank” – to your new page.
According to Intero Digital’s internal linking research: “After publishing something new, go back and link to it from older related content. This prevents orphaning and helps new pages get indexed faster.”
Pages that aren’t linked to from anywhere on your site are called orphaned pages – and they’re effectively invisible to search engines because Googlebot discovers pages by following links. No links in, no crawl.
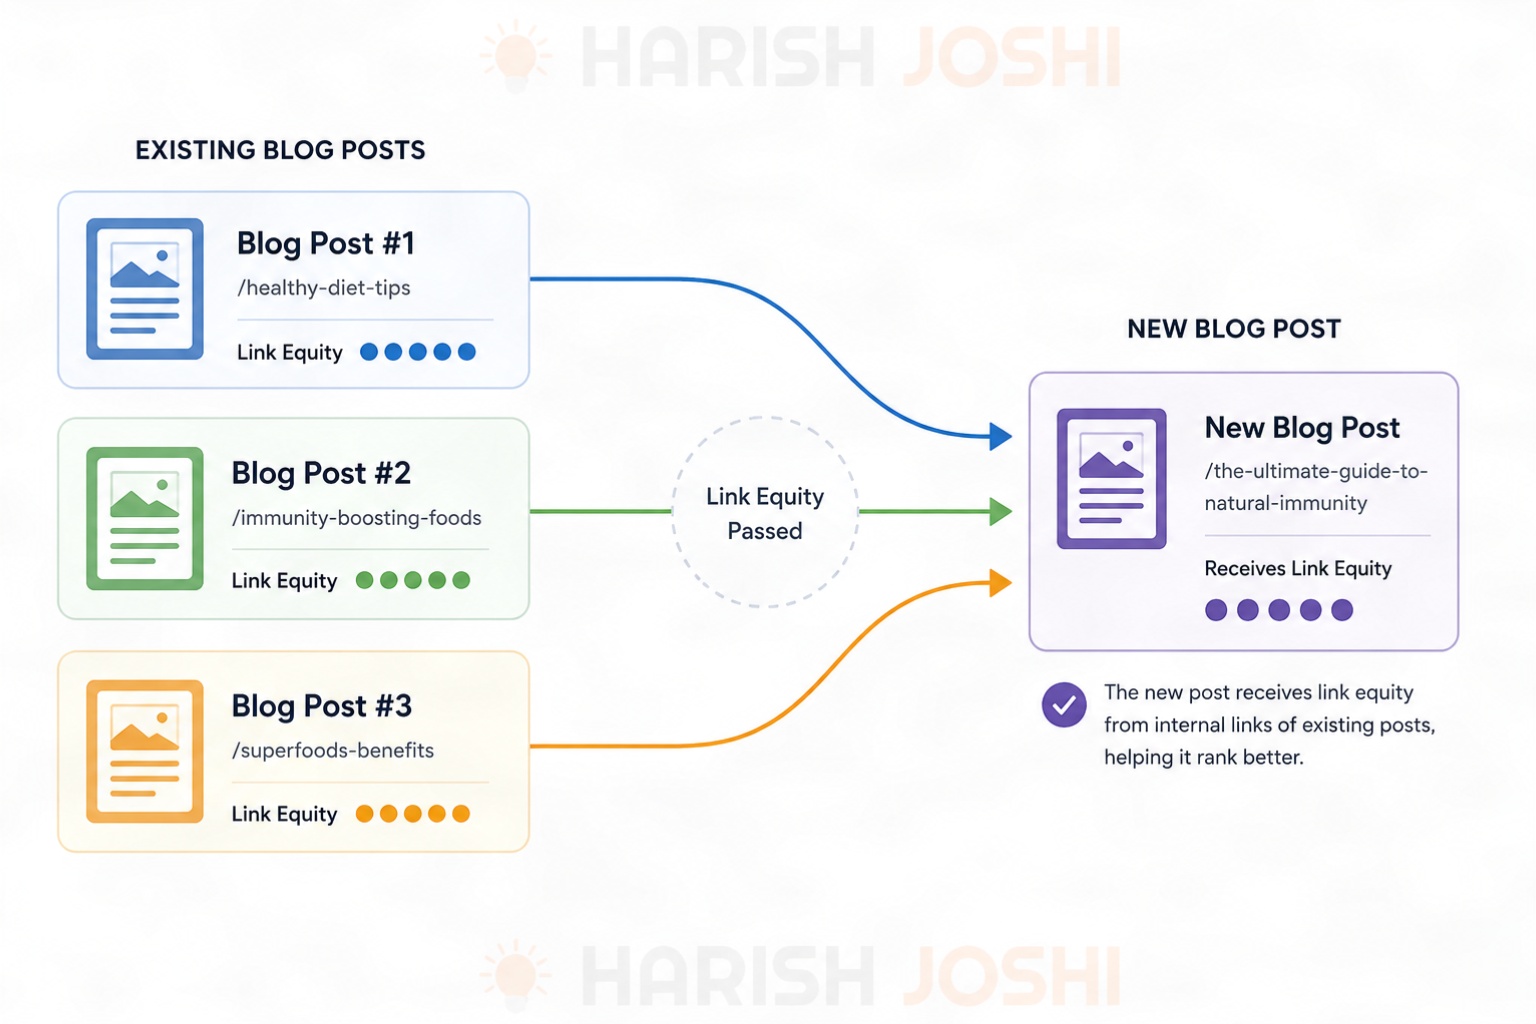
Aim to find 2–3 existing posts on your blog where you can naturally add a link to the new post.
Use descriptive anchor text – the clickable words of the link – that reflects what the linked page is actually about. “Read my full guide on [topic]” beats “click here” every time.
Step 4: Share on Social Media – But Do It Right (15–20 Minutes)
Publishing and waiting is a passive strategy. Sharing your post is an active one – and the first 24–48 hours after publishing tend to determine how much early traction a post gets.
But there’s a right way and a wrong way to share blog posts on social media.
The wrong way: “New blog post! Check it out → [link]”
Nobody clicks that. There’s no reason to.
The right way: Pull the most useful insight, surprising stat, or counterintuitive point from your post – and lead with that. Then mention there’s a full post behind it.
Here’s how I approach each platform:
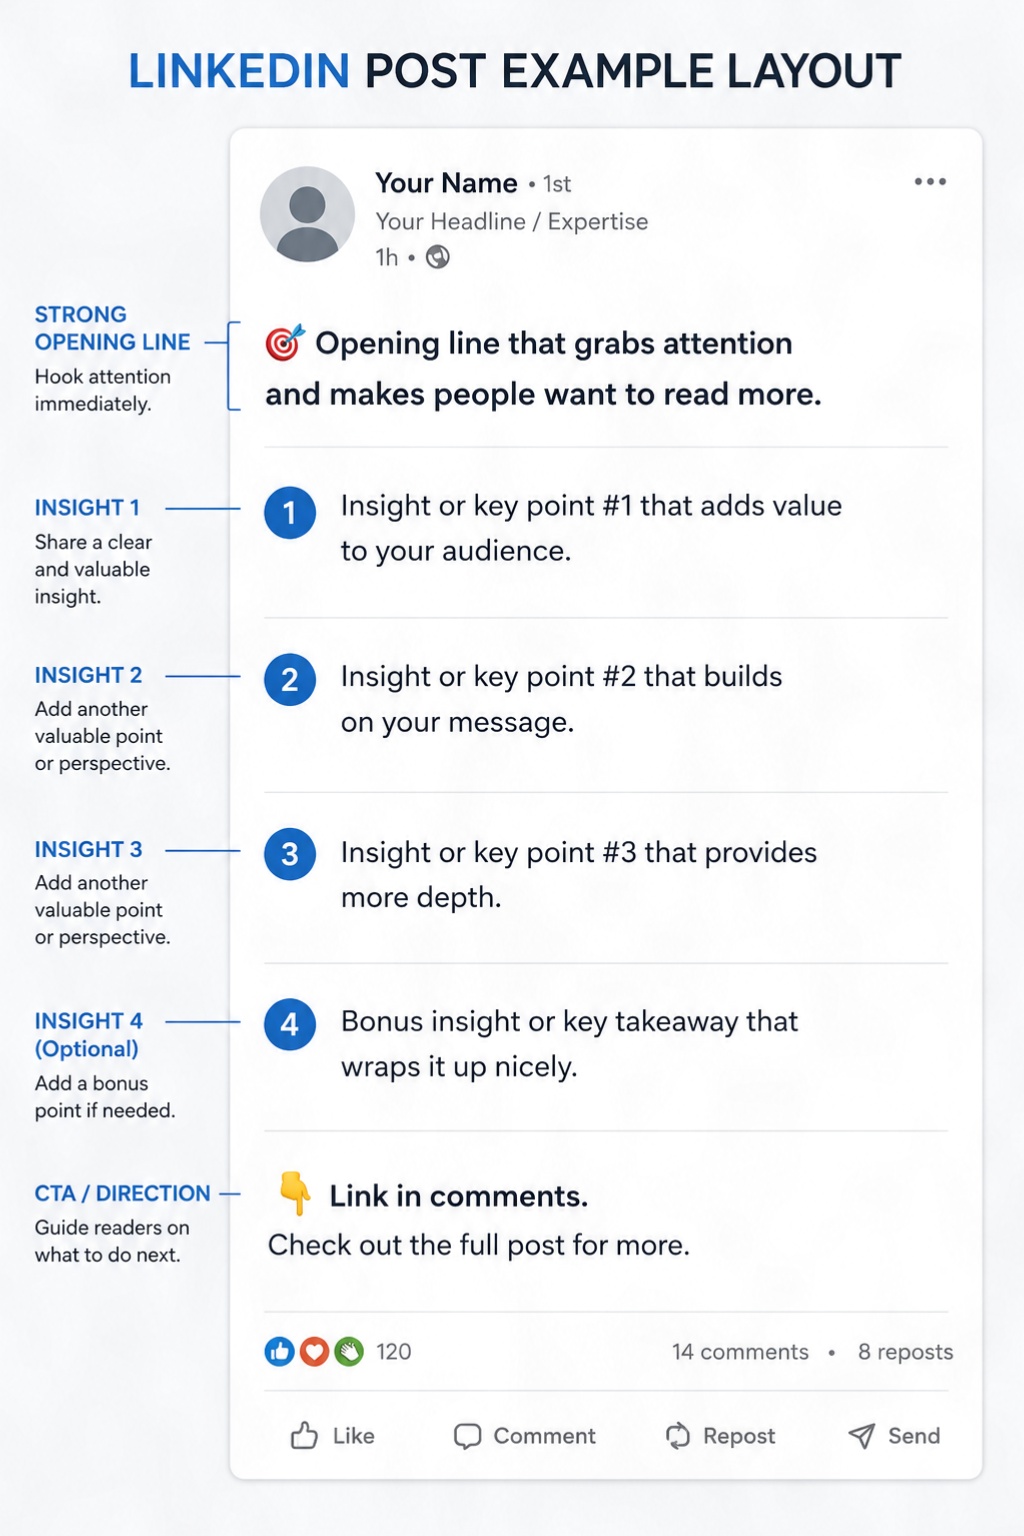
LinkedIn: Write a short 150–250 word post that summarises the most useful takeaway from your article. Don’t paste the link in the body of the post — LinkedIn’s algorithm suppresses posts with external links in the body. Instead, put the link in the first comment and say “Full post in the comments.” This gets significantly more reach than linking directly.
X (Twitter): Turn the post into a short thread. Start with the most surprising point. Each tweet covers one key insight. Last tweet links to the full post.
Instagram / Facebook: Create a simple graphic with the post’s main headline or a key stat. Use the caption to expand on the idea and direct people to the link in bio (Instagram) or the post link (Facebook).
The goal isn’t to dump the whole article on social media. It’s to give people enough value that they want to read the rest.
Step 5: Notify Your Email List (If You Have One)
If you’ve built an email list – even a small one – a new post is a reason to email them.
Keep it short. Don’t paste the entire article in the email. Write 3–4 sentences explaining what the post covers, why it matters, and include one clear link to read it.
Subject lines that work:
- “Just published: [post title]”
- “I wrote about [specific problem] — here’s what I found”
- “[Counterintuitive insight from the post]”
Email subscribers are your most engaged audience. They’ve already said they want to hear from you. A new post is exactly what they signed up for.
If you don’t have an email list yet — that’s a separate conversation. But every post you publish should remind you why building one matters.
Step 6: Add the Post to Relevant Content Aggregators and Communities (20 Minutes)
This step depends on your niche – but for most bloggers writing about business, marketing, or web topics, there are communities worth submitting to.
A few worth knowing:
Reddit: Find the relevant subreddit for your topic and contribute genuinely. Don’t just drop a link – engage first, add value to the discussion, and share your post when it’s genuinely relevant. Spam gets removed. Helpful contributions get read.
Quora: Search for questions related to your post’s topic. If your post answers a question being asked on Quora, write a real, helpful answer there – and link to your post as a “for more detail” reference at the end.
LinkedIn Groups: If you’re in any active LinkedIn groups in your niche, share the post there with a brief explanation of why it’s relevant to that group.
Niche forums or communities: Whatever industry you’re in, there are probably active communities (Slack groups, Facebook groups, Discord servers) where your post might genuinely help someone.
The key word throughout: genuinely. These communities are valuable exactly because they don’t tolerate spam. Add value first.
Step 7: Check Your Schema Markup and Structured Data
This one is more technical – but it takes less than 5 minutes and can have a real impact on how your post appears in Google.
Structured data (schema markup) tells Google additional information about your content: who wrote it, when it was published, what type of content it is, and more. This is what enables rich results – things like FAQ dropdowns, article dates, and author information appearing directly in search results.
Go to Google’s Rich Results Test and paste your new post’s URL. It will tell you:
- Whether Google detected any schema markup on the page
- Whether it’s valid or has errors
- What rich result types your page is eligible for
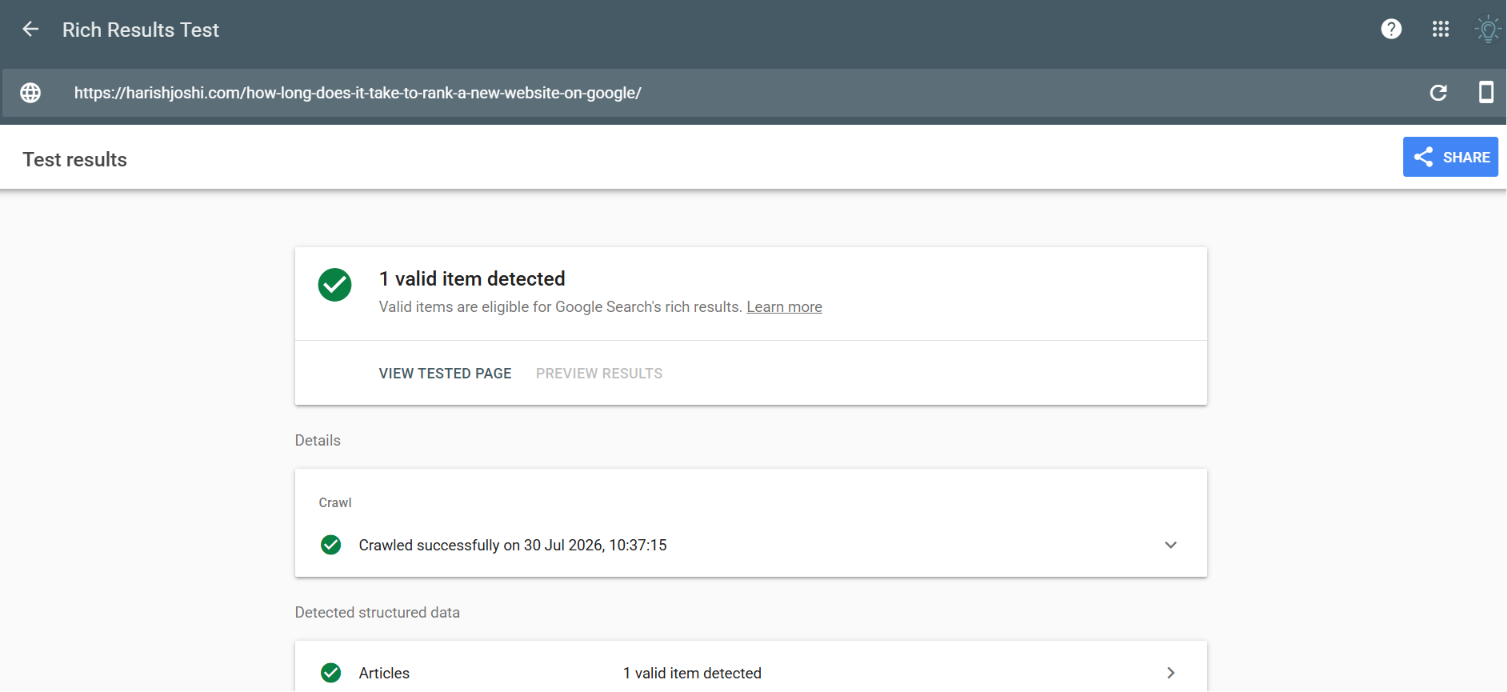
If you’re using WordPress, plugins like Yoast SEO or Rank Math automatically add Article schema to your posts. But it’s still worth checking — especially for the first few posts, to confirm it’s working correctly.
For blog posts, the most important schema types are:
- Article – author, headline, publish date
- FAQPage – if your post has a FAQ section (Google can display these as expandable dropdowns in search results)
- BreadcrumbList – helps Google understand your site structure
Step 8: Set a Calendar Reminder to Update the Post in 6 Months
This one sounds odd – why think about updating a post you just published?
Because Ahrefs’ ranking data shows that the average #1 ranking page is 5 years old. Older, consistently updated content outperforms newer content across almost every competitive keyword.
The mistake most bloggers make is publishing and forgetting. They write a new post, it gets some early traction, falls off the first page, and they move on.
The better approach: set a reminder now to revisit the post in 6 months. When you do, check:
- Is the information still accurate?
- Are there new stats, studies, or developments worth adding?
- Are there questions in the comments you should address in the content?
- Is the post appearing in Search Console but not yet ranking on page 1? Expanding it or improving the target keyword focus might be all it needs.
I do this at 6 months rather than a year – because in a fast-moving topic area, 6 months is often enough time for information to go stale or for Google’s assessment of the post to be clear.
Step 9: Monitor Performance in Google Search Console
Once your post has been live for 2–4 weeks, start checking how it’s performing in Google Search Console under Performance → Search Results.
Filter by the URL of your new post. Look at:
- Impressions: Is Google showing your post in search results? Even if clicks are zero, impressions tell you Google has indexed it and is showing it for some queries.
- Average position: Where is it appearing? Position 45 is very different from position 15 – but both are better than not showing at all.
- Which queries are triggering it: This is the most useful data. Sometimes Google ranks your post for keywords you didn’t target – and those can become the basis for follow-up content or refinements to the post.
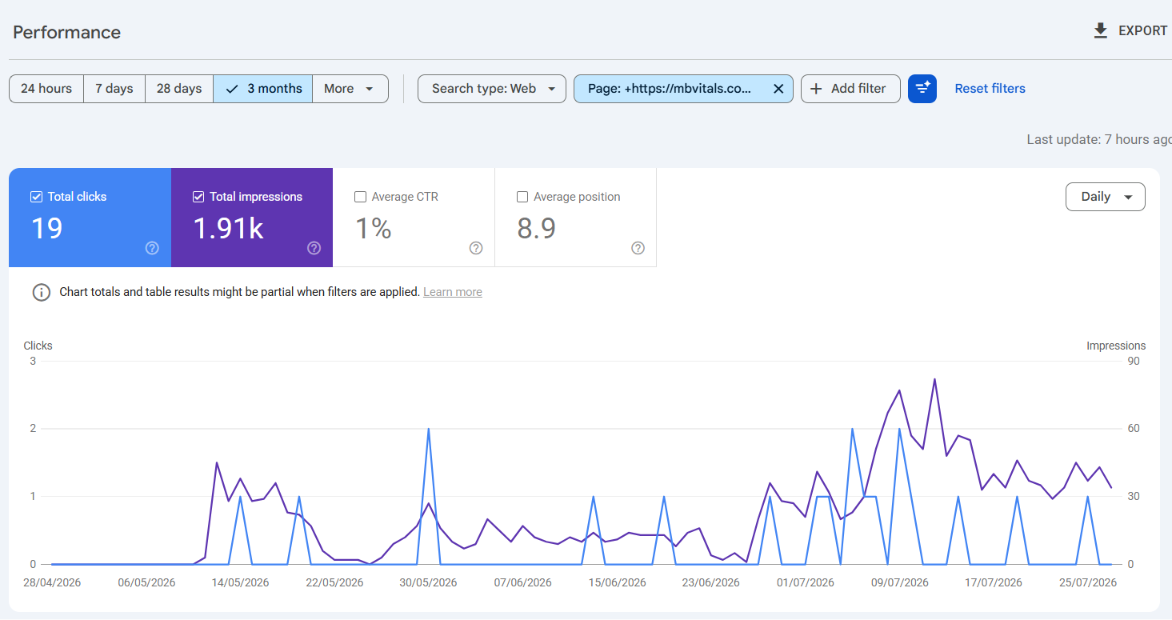
Most new posts won’t rank on page 1 within the first month. But climbing from position 50 to position 22 is meaningful progress – even with no clicks yet. Watch for that movement.
If after 3 months a post has impressions but is stuck around position 20–40, that’s a signal the post needs strengthening – more depth, better internal links, or more focused targeting on the right keyword.
Step 10: Repurpose the Content Over the Following Weeks
One blog post can become multiple pieces of content across multiple platforms – without writing anything new from scratch.
This is what content professionals mean when they talk about repurposing. The research and thinking is already done. You’re just repackaging it.
From a single blog post, you can create:
A LinkedIn carousel post: Take your post’s key steps or points and turn each one into a slide. Carousels perform exceptionally well on LinkedIn than standard link posts.
A short video or Reel: Pick the single most useful insight from the post. Record yourself explaining it in 60–90 seconds. This works on Instagram Reels, YouTube Shorts, or LinkedIn video.
An X (Twitter) thread: Break the post into 6–8 tweet-length insights. Start with the most surprising one. End with a link to the full article.
A quote graphic: Pull a strong line or stat from the post, turn it into a clean text graphic, and share it with a brief caption.
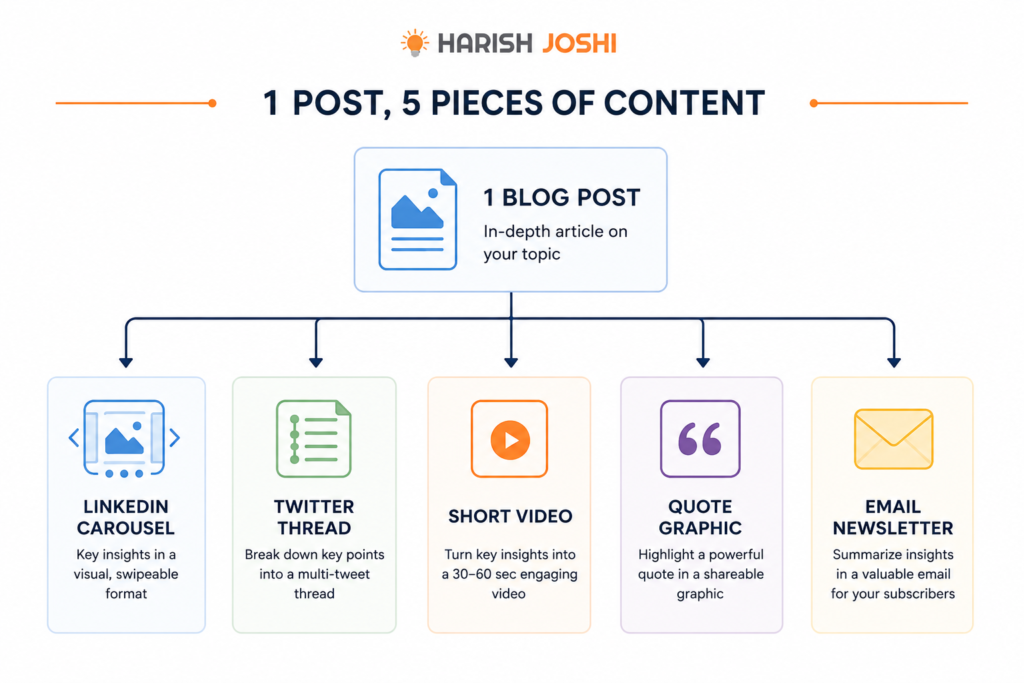
The benefit is compounding reach. Not everyone reads your blog. But someone on LinkedIn who sees your carousel might click through to read the full post – and then subscribe. Someone on X who sees your thread might share it with followers who never would have found your blog otherwise.
According to Buffer’s repurposing research, LinkedIn drives 46% of social traffic to B2B websites.
For anyone writing about business, marketing, or professional services, repurposing blog content for LinkedIn specifically is one of the highest-return activities you can do.
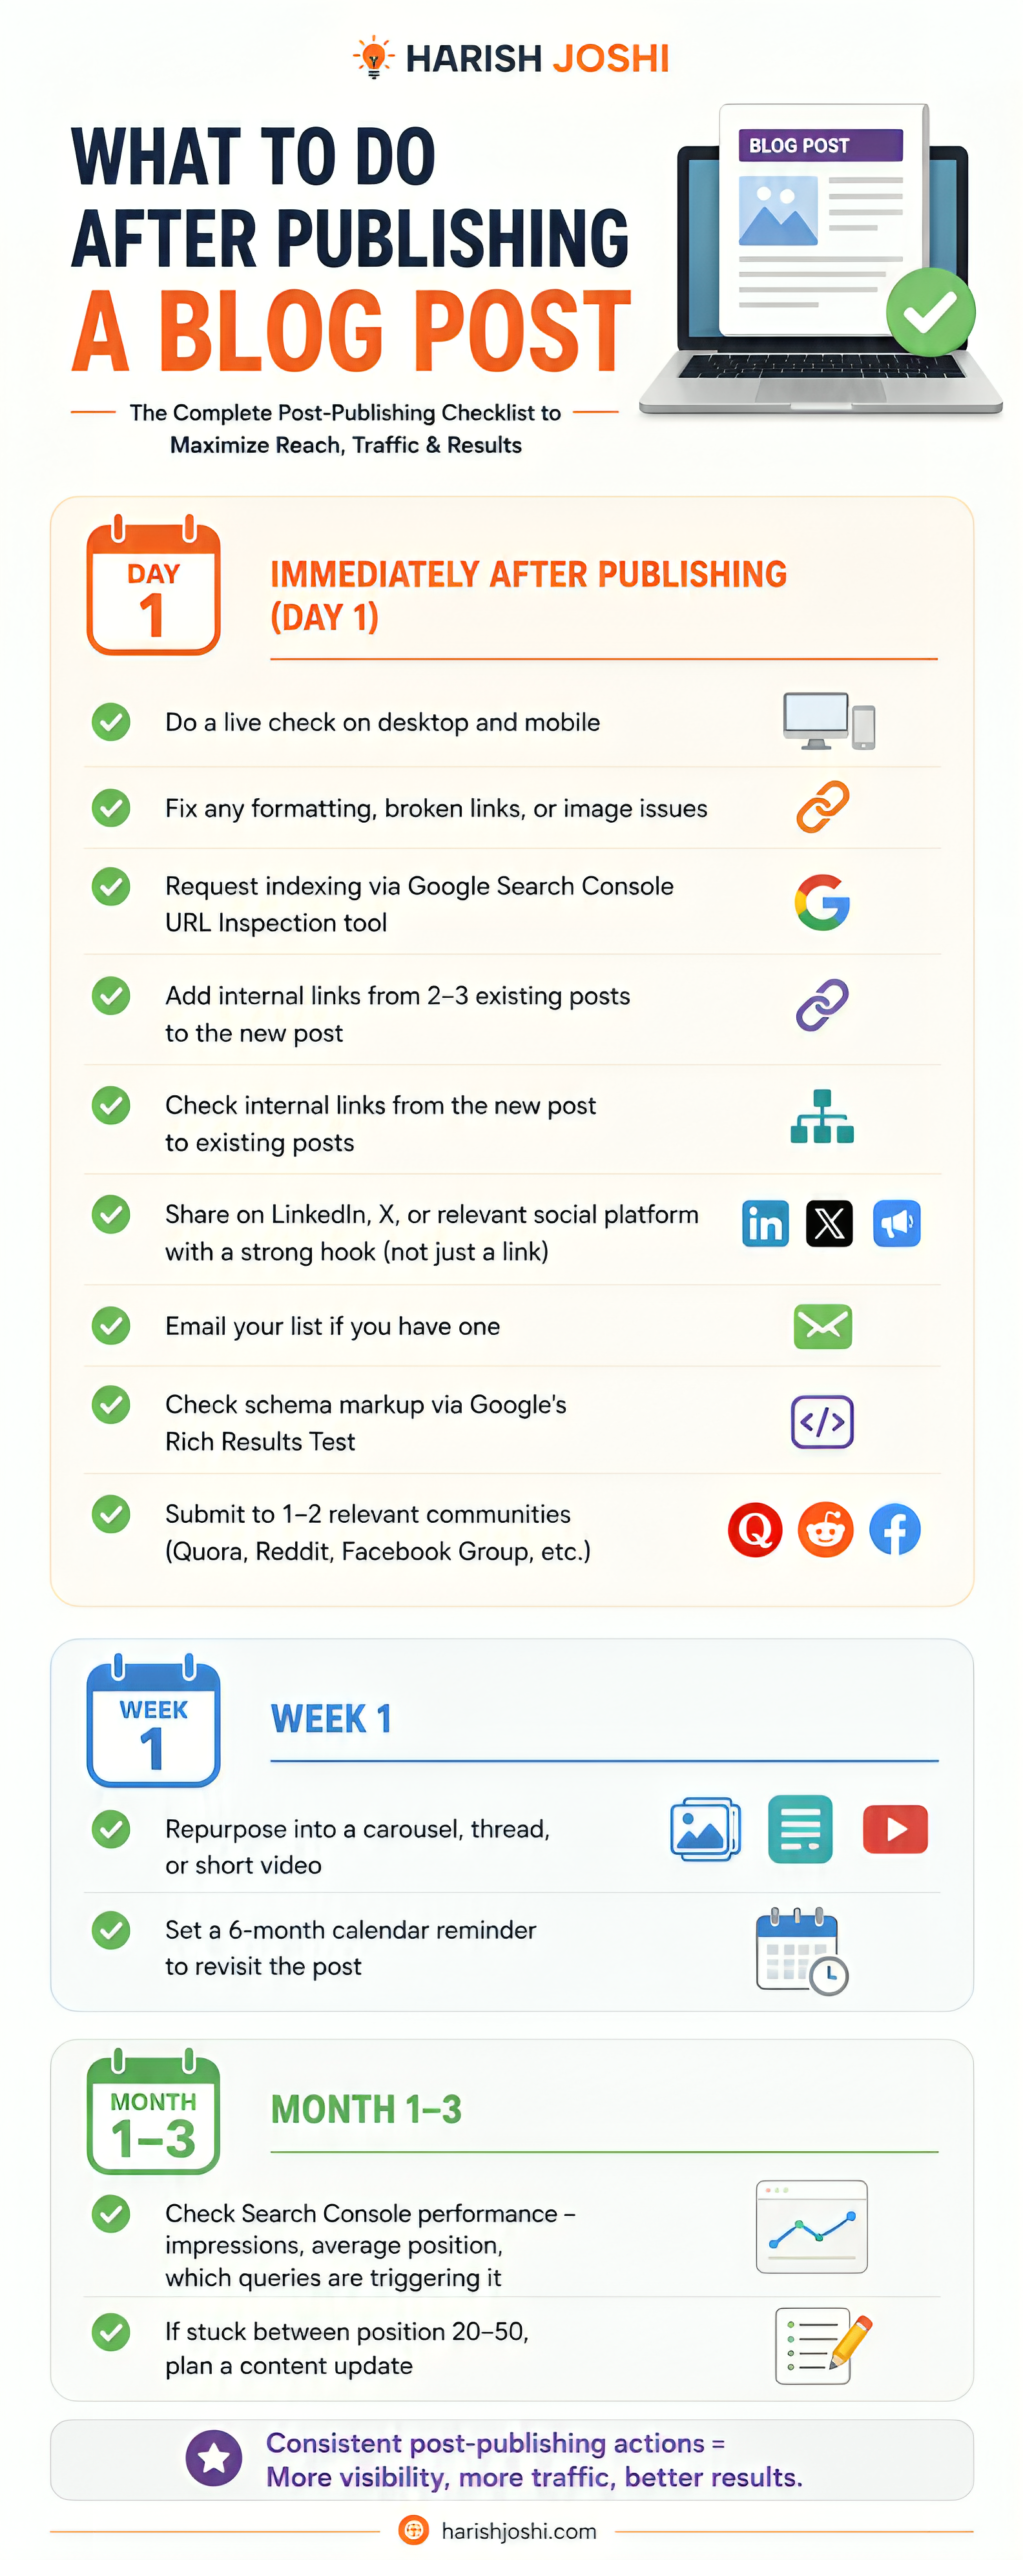
The Complete After-Publish Checklist
Here it is as a clean checklist you can bookmark and use every time:
One Mindset Shift That Changes Everything
Most bloggers treat publishing as the destination. Write the post → hit publish → done.
The bloggers who actually build traffic treat publishing as the starting point. The post is the asset. Post-publish work is how that asset gets discovered, shared, shared again, linked to, and ultimately ranked.
A mediocre post with great post-publish work will almost always outperform a brilliant post that was published and abandoned.
The good news: the checklist above takes roughly 60–90 minutes for each post. Spread across the first week after publishing, that’s not much. And for every post you do it for, the compounding effect grows – more internal links, a stronger site architecture, more social reach, and more indexed content for Google to work with.
Final Thought
Publishing a blog post and expecting traffic to appear on its own is like opening a restaurant and not telling anyone. The food might be great. But if nobody knows you’re there, it doesn’t matter.
Post-publish work is how you open the doors, turn on the lights, and get people in the room.
If you’re building a blog as part of a broader strategy to grow your business online – whether that’s generating leads, building authority, or ranking on Google – I help businesses do exactly that through website development and SEO. Let’s talk if you want a strategy built around your specific goals.
Frequently Asked Questions
It varies. Most new posts take anywhere from 3 to 12 months to rank consistently on page 1 for competitive keywords. Requesting indexing via Google Search Console gets the post into Google’s index within hours – but ranking takes time, links, and engagement signals to develop.
Yes – the first 24 hours are the best window for initial social media reach. Share your post on the day it’s published, but focus on creating a compelling hook (a key insight or surprising stat) rather than just dropping a link.
It guarantees faster indexing (Google finding and storing your page), but not faster ranking. Ranking depends on content quality, backlinks, and your overall domain authority. Indexing just ensures Google knows the post exists – without it, Google may not find your new post for days or weeks.
From the new post itself: link naturally to 3–5 related posts on your blog where it genuinely adds value for the reader. From existing posts to the new one: go back and add 2–3 links from older, already-indexed posts. Avoid forcing links – they should feel natural in context.
Not necessarily every post equally. Prioritise repurposing your most useful, evergreen posts – the ones that answer a specific question people will be asking for years, not news-based or time-sensitive content. Evergreen content gives you the most return on repurposing effort.
Check Google Search Console first. If you have impressions but are stuck at position 30–50, the post is in Google’s index but needs strengthening – more depth, better internal linking, or a more focused keyword. If you have zero impressions, the post may not be indexed at all, or you may be targeting a keyword with almost no search volume.